By Liza Veto, Program Officer, Mass IDEAS, Next Generation Learning Challenges
A few years ago, I decided to set fun New Year’s resolutions to prompt myself to make time for joyful things. It was in that spirit that I determined to take a creative class each month in 2017.
This is the fifth post in a series about my experiences implementing my resolution. Unlike the previous posts where I have discussed being a student in creative classes, this one describes my experience as a teacher of making. By helping my colleagues understand how to create cyanotype greeting cards, I learned firsthand how complicated teaching makers can be. Below, I share some insights about maker education that I gained by offering a mini-lesson in cyanotypes. Additional resources about facilitating project-based learning for adults are also provided.
Lesson #5: Teaching makers is complicated, time-consuming, and worth it!
Lesson learned: February 2018, cyanotypes
The majority of this blog series is dedicated to lessons learned from creative classes in which I was a student. Last month, my learning came from teaching a making workshop for my colleagues as part of our team retreat.
Our team is virtual, but a few times each year, we convene for multi-day retreats that are comprised of larger, strategic projects and interpersonal team-building time. The whole team has been supportive of me blogging about my 2017 making journey, so our director, Andy, thought it would be a fun team building activity for me to organize a group making experience. About a month in advance, I was offered an hour during the four-day agenda to do our making in the Miami Airbnb house where we were staying. Other than the suggestion that “decorating t-shirts might be fun,” I had free rein to develop my in-person lesson for the team.
Planning the Making Experience
As I thought about both what we could execute and what would be fun to do, I considered the following variables:
Our Airbnb house had a kitchen and outdoor space, but I just had the online profile to help me understand the space.
Doing a really messy project would be a bad idea in a rental house.
Miami is generally sunny.
All of us were traveling by air to the meeting, meaning that I would need to pack necessary materials, and participants would want something they could take home easily without checking a bag.
Our schedule allowed for only an hour, so our making couldn’t require a lot of steps or time.
In general, adults (including me!) have varying degrees of comfort with trying to make something that looks realistic, so projects allowing for abstraction prevent “I can’t draw” stress.
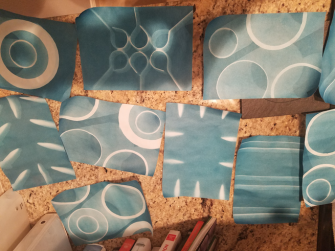
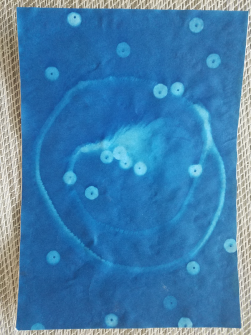
Using these criteria, I decided that our project would be to create cyanotypes. A cyanotype is an early cousin of photography: shapes are placed on pre-treated paper, sun exposure is used to “take” the picture, and a water rinse “develops” the image. This project would also have the bonus of replicating two of the positive feelings I experienced during my paper marbling class: 1) feeling successful quickly with a new craft, and 2) enjoying “the reveal” as the image came into focus.
A couple of days before leaving for Miami, I went to a local Dick Blick art store branch and received some professional guidance about the materials we’d need to execute the project. Notably, my Blick consultant helped me think through an iteration of my original concept; because the cyanotype paper is lightweight and thin, the finished images would need support to prevent bending and tearing. I could avert these problems by providing blank greeting and postcards to which participants could affix their cyanotypes. I packed my bag and headed to Miami.
Onsite Materials Procurement
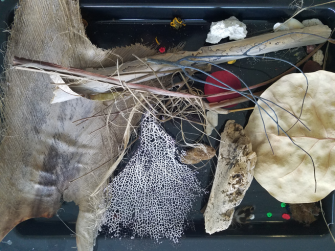
Although I had gathered most of our cyanotype materials in Boston, I planned to procure various objects in Miami that would serve as the basis for people’s designs. Because cyanotypes work by exposing some parts of the paper to sunlight and blocking other parts, items with interesting shapes are fun to try. First, I scoped out our rented house for any manufactured objects that we could use to create designs. I scavenged the kitchen and bookshelves for inspiration, finding everything from interestingly-shaped corkscrews and chip clips to candles and bric-a-brac.
I also enlisted the aid of a colleague to find some natural items during her morning walks on the beach. She got really into it and brought back great loot, from shells and grasses to driftwood and leaves. And she asked a question I hadn’t anticipated: whether the objects would be “used up” or otherwise damaged in the process. She was relieved that my response was no, because she liked some of her finds so much that she wanted to take them home!
Note: Optimally, my colleagues would have sought out their own objects to further their buy-in for their cyanotypes. However, I made the modification to provide inspirational materials due to the time restriction we had for the activity.
Real-World Implementation
In the draft retreat schedule, our maker activity was slated for the end of the first day of programming. The week prior, we realized that this wouldn’t work well with the schedule, and that the third day would actually be more conducive to a fun activity, so we made that revision. However, on Day 3, we covered some really challenging topics, and our discussions went longer than expected. This led me to make the game-time decision to postpone our crafting until the next morning during a free block. My colleagues were grateful to have a break, and I was grateful not to race through the activity while the sun was setting!
I awoke on the last full day of the retreat excited for our maker activity, feeling well-planned and intrigued by the various manufactured and natural shapes we would use to design. And then I looked out the window to an overcast sky. I panicked! The one thing I couldn’t control was the sun. I dressed quickly and did a test run out in the yard; although it took a little longer for the exposure, there was enough sunlight for the process to work. Whew! I set up the materials and developing stations and got ready to make.
Making Cyanotypes
When maker time arrived, five of us decided to participate. I provided a short description of what we’d be doing, outlined the steps to creating a cyanotype, and displayed our materials. Participants’ questions and comments included:
“I remember this from being a kid!”
“How long does processing take?”
“Could you do streaks of water?”
“Can we have multiple [cyanotypes] going at once?”
After a little more explanation and clarification, we went to work.
The first thing I noticed was a difference between people who wanted to move quickly to sun exposure, and others who spent more time selecting objects and composing their designs. There were procedural questions during this period, such as “Is this ready?” and “How long do I leave it in the water?” I sensed a little bit of frustration that there weren’t clear “rules;" much of the process involved eyeballing when the paper was sufficiently exposed, and trial and error.
I also noticed some informal and very explicit prototyping. For instance, a couple of people jumped right in to generate initial creations while others decided to hang back and observe. Comments such as “I’m going to watch _________’s technique here” and “Now ________ can do an improved version of the one I just did” illustrated the group’s gravitation to build on earlier efforts. This was not positive 100% of the time; for example, one person said, “Well, that’s disappointing!” when her efforts to lay out an interesting design didn’t produce the outcome she had envisioned. However, even during our short time, participants learned some critical lessons, such as discovering that crisper images resulted when lighter objects were weighted down.

Reflections and Insights
When I reflect on this class compared to the ones in which I was a student, one immediate difference is the investment of time and energy required to design an effective making experience. I devoted between seven and eight hours (plus my beachcomber-colleague’s time) to planning, sourcing advance materials, assembling onsite materials, pre-testing, instruction, and clean-up...for one hour of making. It requires a lot of thinking and effort to plan an activity that is well-resourced, understandable, and leaves students feeling successful. And I had a very willing class of kind colleagues who I knew would give me the benefit of the doubt if everything didn’t go perfectly; bored or confused kids aren’t nearly so forgiving! Plus, I could rely on what I assumed to be my colleagues’ previous learning, like basic photography concepts and how weight might help their designs. (With this reflection, I better appreciate and offer an enormous thank you to all of the maker-teachers I learned from in 2017!)
Even as I thought about the time and effort invested in creating that activity, I wondered: did the participants experience any benefits from this type of learning? Despite frustrations, time constraints, and other hurdles, my students seemed to experience positive impact from making their cyanotypes. For instance, two participants specifically called out the joy of having a “creative interlude” and appreciated “using a different side of my brain.” The maker activity may have resonated in that way in particular because it occurred in the middle of two days of strategic planning work. In addition, one person drew connections between the cyanotype activity and the group’s collective effort to make dinner earlier in the week. “This was fun--like when we made pizza the other night--making is good practice. It’s good for the soul!”
I discovered one final piece of evidence about the activity. Because cyanotypes are “developed” by rinsing in water, they require drying time. That evening, I collected all of the papers from outside, and set up a self-serve, card-making station on the dining table. Multiple participants used their cyanotypes to make cards, and three expressed excitement about sharing their work with others (including one card that was mailed to me as a thank you!)
Finally, this activity allowed me to reflect on my own learning as a teacher, which was different from the making I enjoyed as a student last year: What did I gain by teaching making to others?
First, this experience forced me to think through my craft from start to finish. I couldn’t just show up in Miami and wing it; I had to consider our learning environment, procure and transport the materials, and devise a project that would work in the hour allotted. I decided to try a craft that was new to me, which also meant that I needed to research how it was done, get guidance from others, and pre-test the activity. I improved my own practice by answering students’ questions and by doing the activity with them. For instance, I now know better what thoroughly-exposed cyanotype paper looks like, and I have a sense of how long to rinse the paper. I also reconsidered the level of expertise I assumed was required to teach a craft to others; really, I just needed to facilitate my colleagues’ learning, not become a world-renowned expert on cyanotypes. Finally, teaching the craft to others made me want to do more of it; a couple of days later, I experimented with the remaining cyanotype paper in a different environment and with different objects to see what images would result.
Want to learn more about facilitating project-based learning for adults? This article provides arguments about why you should teach what you know, such as to further your own learning; this synopsis of Washington University in St. Louis research findings indicates that students learn more if they expect to teach the material to others. This short piece distills Malcolm Knowles’ work on adult learning into five key principles to keep in mind when teaching adults (which look remarkably similar to key principles of personalized learning!) And if you want some basic tips about preparing to teach your own workshops, Artwork Archive has some pointers.
Tip for learning by teaching during your own Year in the Making: You, too, can learn by teaching others to make, especially if you think of yourself as a facilitator of others’ learning instead of someone who knows absolutely everything about the craft. Whether it’s a child or another adult, who would appreciate the chance to try the craft you enjoy? How can you construct a positive environment for someone to engage in a creative project, on a small scale (individual, informal tutoring) or on a large one (offering a multi-session class)? You will spread learning and joy to others and advance your own learning in the process.
Other Posts in This Series
- In my first post, I talked about how making provides a different type of learning than most traditional schools provide.
- In the second post, I reflected on the sense of accomplishment that comes with making.
- For my third post, I considered the many non-classroom locations that could enhance learning experiences.
- For my fourth post, I examined a variety of factors that contributed to a class that wasn’t an effective learning experience for me.
All photos in this piece by Liza Veto, CC-BY 4.0.